Taking notes by hand is better than typing your notes on a computer. Handwriting forces you to slow down and focus on what is important. This greatly increases comprehension.
That is where the Cornell Method comes in. The Cornell Method has you separate your notes into a note-taking portion, key points, and a summary. It is ideal for lawyers.
I didn’t pursue the Cornell Method as some sort of lifehack or magic productivity enhancer. I stumbled upon it because I wanted some really nice legal pads. Well before law school, I’d developed a completely unnecessary fondness for the Levenger catalog, which carried within its pages nice pens, some lap desks, and some legal pads that cost approximately five times any other legal pad I’d ever seen. The catalog waxed rhapsodically about the weight of the paper and the smooth as silk feel you’d have written on it with your fountain pen, but never explained the weird huge margin at the left-hand side. I figured I’d live with that, and plunked down $25 in 2001 dollars for a five-pack. That large left-hand margin turned out to be my introduction to the Cornell Method, and I have been a devotee and an evangelist ever since.
Setting Up the Cornell Method
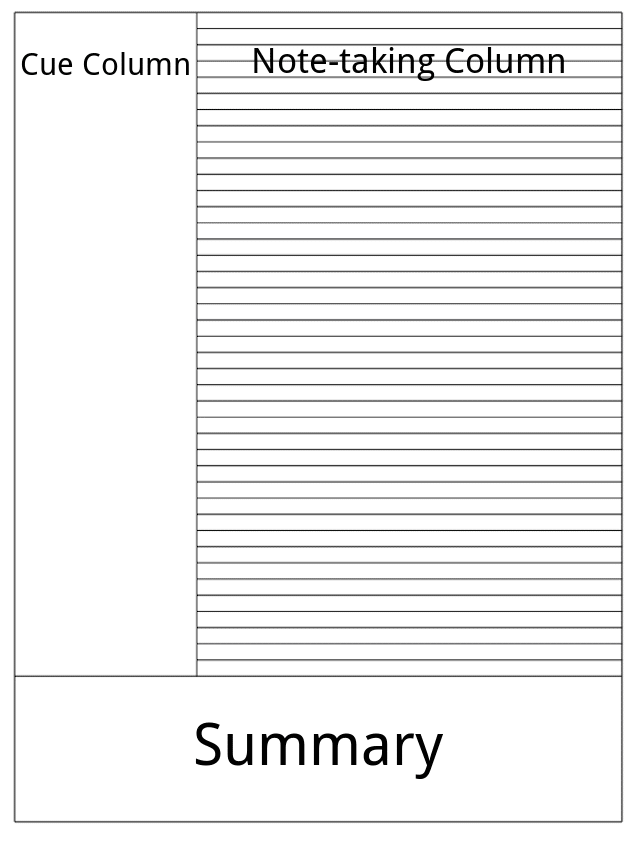
To arrange your notes in Cornell fashion, take your standard legal pad and draw a thick vertical line down the left-hand side of the paper, approximately 2-3 inches from the side of the page. Then draw a horizontal line all the way across the paper about two inches from the bottom of the page. You will end up with something like this:
You can also design one online and print it, or you can purchase Levenger pads optimized for the Cornell Method.
There. You are all done getting ready to take notes Cornell-style.
The Structure of the Cornell Method
Dividing your paper gives you three sections:
- The largest section is for note-taking.
- The left-hand margin is your key points and key questions section.
- The bottom is your summary.
Opinions differ wildly on what should happen with your notes section.
Some people—particularly those that recommend it as a college study tool—subscribe to an elaborate set of rules about recording, reciting, reflecting, and reviewing. You probably do not need to go that deep. However, there is one principle that should guide you if you’re going to take notes using the Cornell Method: write less, not more.
If you have gotten used to taking notes on a laptop, you are already guilty of writing down too much. Treat your notes section like an outline. Shoot for key points, not a verbatim transcript. Think of that section as an outline you will return to later, after your lecture or meeting or motion hearing has finished.
The left-hand margin is your cue and recall section. When you are using Cornell as an academic note-taking method, the cue functions as a memorization and comprehension tool. You should be able to cover up your notes section, and answer any questions you posed to yourself in the cue section. You probably are not going to need to do that with your notes. Depending on what you are taking notes for, this section can contain a series of questions, a roundup of notable points, or to get all business-speak, action items. You should be able to throw your entire notes section away and walk out of your meeting, hearing, or lecture with the key ideas intact. If you are the kind of person who likes to distill your oral arguments down to one notecard, this will seem pretty familiar.
The summary at the bottom is exactly what you would expect: a quick summary of the notes on that page. Internet nerds differ on whether you should do that right when you are done taking notes or after you have reviewed them. I tend to summarize right away, but your mileage may vary.
How the Cornell Method Works For Me
It is not an exaggeration to say the Cornell Method helps me in every note-taking situation I have in my professional life.
In meetings, I use it to easily call out follow-up items by dumping them in the cue section. This can be anything from a statute I need to look up to a call I need to return. Pulling those to-do items and reminders out of the main text of the notes really highlights them. Every time I fall in love with a new type of notebook that does not have the Cornell margin, I go back to trying to just circle, underline, or highlight my follow up items and two things happen:
- My notes look like an utter mess
- I can’t easily find the things I want to do just by glancing at the page.
Pulling your next steps/to-dos/action items over into the left-hand column also works well if you like to reduce your notes to an actual to-do list you put on an index card, in a computer file, or a fancy Getting Things Done tickler file.
That left-hand column is now functionally your list of next actions. In meeting situations, the summary usually ends up being nothing but the date, time, purpose, and attendees of the meeting. This gives me a way to file my notes easily.
When I am listening to someone else talk for any length of time, whether an opponent in court or speaker at a CLE, being forced to organize my notes Cornell-style on the fly means I am actively engaged. If I do not take handwritten notes, my mind drifts, and suddenly I’ve missed everything. Here, I use the notes section to force me into keeping a cohesive outline, even if the speaker wanders around a bit (as lawyers often do).
The arena in which I’ve definitely found the Cornell method most helpful is in organizing my own teaching notes. The notes section covers the main points of my lecture in an outline and forces me to stay on task. The recall section is my dumping ground for everything I can’t deal with in my notes without things getting messy. Questions I plan on asking appear there, linked to whichever part of the lecture they’re related to. Reminders to myself also go there when I’m re-reading notes before getting up to speak. Notes on sources, if I need to mention those, go in the side margin as well.
With that wide Cornell margin, my teaching notes last three or four semesters instead of one. This is because I’m able to use that recall section to highlight key changes I want to make next time I present the material. Finally, the summary functions like the tagging function in Evernote. It contains the week of the semester the lecture occurs, the name of the class, the major topics I’m covering that week, and a page number. This way, when I have shuffled and reshuffled the pages while speaking, I can easily put them back together again when I’m done (or let’s be honest, mid-lecture).
If you are hopelessly disorganized like me, but wish you were an organized person hacking your own tendencies towards chaos, you really can’t go wrong with taking your notes by hand using the Cornell Method to force you into a specific but flexible note-taking framework. All my notes—meeting notes, lecture notes, deposition notes—look and function the same, which means I always know where to put information when I am writing, and I always know how to find information when I’m reviewing later.
The Cornell Method is the only productivity tool that has stuck with me for more than a year, and I am never giving it up.
Originally published 2014-07-18. Last updated 2016-09-05.
Share Article
Last updated July 21st, 2023
